
Have Landroid work in different zones of your lawn. Assign different working time to different zones.
Thanks to the AIA intelligent navigation technology, Landroid has the unique capability to evenly mow complex lawns and reach any zone going through narrow corridors (60cm minimum width) without the need of any extra guiding wire.
However, in some cases, you may want to designate specific zones and assign specific mowing times to each zone.
How to assign mowing time to each zone
According to the shape of your lawn, you may want Landroid to work more in one zone than in the others. You can do this by assigning a percentage to each zone.
Please note that the percentage is referred to the total number of mowing sessions your Landroid performs in a week, which obviously depends on the size of your lawn.
What is a mowing session?
It is the time between when Landroid leaves the base and when it returns to it. Such time changes model to model, depends on the capacity of the battery and the length of the perimeter.
Example:
Let’s assume a Landroid is set to perform 10 sessions per week (100%). If you assign 70% to Zone 1 and 30% to Zone 2, over the course of a week your Landroid will perform 7 mowing sessions in Zone 1 and 3 in Zone 2.
Note:
You can set up from a minimum of 2 up to a maximum of 4 different zones.
Landroid will mow following the numerical order of the zones, starting from Zone 1.
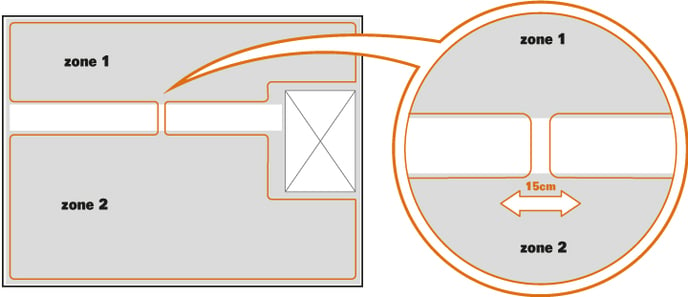
Bottlenecks
Zones should be separated by a bottleneck, leaving a corridor of around 15cm. This serves the purpose of preventing the Landroid from autonomously wander from one zone to another (being extremely smart and extremely autonomous, it will). By creating a bottleneck, the robot will be able to follow the boundary wire and reach each zone, but won't accidentally mow where it's not supposed to.

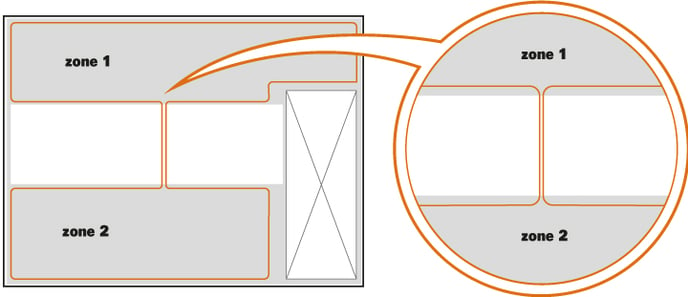
What if there's a walkway in my lawn?
First of all, please make sure the walkway is level with the lawn. If there are steps or drops, the blade disc might be damaged when the robot crosses it. If this is the case, you should create a ramp of sorts to even out the terrain.
Please also remember that if the path is made with gravel, stones, uneven tiles, or anything like this, the Landroid might get stuck.
In order to allow the Landroid to reach each zone, you should create a 15 centimeters wide corridor. It need to be narrow enough so that the robots can't accidentally go through it while mowing (it's the same principle mentioned above for the bottleneck).
It's important not to lay the boundary wire on the surface of the path, otherwise it might get damaged by people or by Landroid itself.
If you have a tiled path, you can install the wire in between, and then grout over it.
If you want to lay the boundary wire underneath a tiled path or anything like that, please remember not to bury it deeper than 5 centimeters, otherwise the signal will deteriorate and it won't be detected by Landroid.
What if my lawn has two or more unconnected zones?
The boundary wire needs to be connected to the charging base at all times. So if there are two (or more) parts of the lawn which are separated by some sort of terrain which is inaccessible for Landroid, they still need to be connected with the same boundary wire.
In order to create two closed loops of boundary wire, you need to keep the two segments coming and going between two zones next to each other.
Please remember that in this case, you shouldn't be using the multi-zone feature, since you will have to manually carry Landroid between each zone. Also remember that once the battery runs out, should Landroid be in a zone where there's no charging station, it won't be able to go back and recharge.
A possible solution to overcome this problem is to buy a second charging base and install it in the second area with its own boundary wire. You will still have to carry Landroid from one zone to the other.
To proceed with the setting of different zones please refer to the articles below depending on your Landroid model:
- Landroid S, M, L 2019-2023 (LCD display and LCD display + knob)
- Landroid M, L 2016-2018 without Wi-Fi
- Landroid S 2017/2018